Wednesday, October 31, 2012

Chicago Fine Chocolate Show Nov. 16-18th at Navy Pier


I'm excited to share that we're going to the Chicago Fine Chocolate show at Navy Pier November 16-18th. What is the Chicago Fine Chocolate show you might ask?  It's a place where chocolatiers from all over the world are coming to showcase their chocolates.  It's the very first year and there are going to be at least 100 vendors.  Not only are we going, we've got press passes so you'll definitely get to see everything!  

Due to this, I'm pretty sure the majority of November is going to be all about chocolate here on Rosie Discovers.  Already we've posted a recipe for a buttermilk chocolate bread, which totally rocks BTW, and there will be many more recipes to come.

If you're interested in attending the show, tickets are $35 for adults and include 15 tickets to try the chocolates.  

Wholesome Wednesday: Buttermilk Chocolate Bread Recipe


I have to start this post by saying I am not a fan of anything Taste of Home.  I typically don't like the magazines or the cookbooks because the recipes aren't very good.  If you're a big fan of Taste of Home, I'm sorry if I've offended you.  That said, I look at an ungodly amount of cookbooks.  We're talking stacks and stacks.  I also have bookcases full of cookbooks.

This recipe comes from the new Taste of Home Best Loved Recipes cookbook.  It's a massive tome, think dictionary size, arranged alphabetically by category.  I thumbed through the entire book and found just a few recipes that looked promising.

I love buttermilk breads.  They turn out moist and taste wonderful.  They also don't require fooling around with yeast.  I was hoping this bread would be more of a sandwich bread, but it was like a chocolate loaf cake.  That's not at all a bad thing, just not what I was looking for.  This recipe was a huge hit though.  The entire loaf was gone before the very next day!  Now that's a ringing endorsement!

If you need a quick chocolate dessert, definitely try this bread.  You'll get rave reviews!

Buttermilk Chocolate Bread

1/2 cup butter, softened
1 cup sugar
2 eggs
1 1/2 cups flour
1/2 cup baking cocoa
1/2 teaspoon salt
1/2 teaspoon baking powder
1/2 teaspoon baking soda
1 cup buttermilk

In a large bowl, cream butter and sugar until light and fluffy.  Add eggs, one at a time; beating well after each.  Combine flour, cocoa, salt, baking powder, baking soda; add to creamed mixture alternately with the buttermilk.

Pour into a greased 9 x 5 inch loaf pan.  Bake at 350 degrees for 55-60 minutes or until toothpick comes out clean.  Cool 10 minutes in the pan before removing.  Continue to cool on wire rack.

Susie Savors: The best evidence I have that this bread is delicious, is that it did not make it to the second day.  Warm out of the oven, this bread functioned as hot slices of chocolate.  The bread speaks for itself.

Tuesday, October 30, 2012

Gorton's Shrimp Scampi Wontons Recipe + Giveaway


Did you know October is National Seafood month?  Well it is and I just barely am squeaking in with my post about it.  :)  Tomorrow is Halloween, my absolute favorite holiday, also the last day of the month.  To support this Gorton's has been running a campaign all month called "Eat Seafood Twice a Week."

October being National Seafood month it's a great reason to make a change in your regular routine.  Seafood is a great healthy protein meal option.  One that I can say does get overlooked at my house.  I didn't grow up eating a lot of seafood besides the occasional shrimp, salmon (which I detest) and canned tuna.  My parents didn't really care for it.  That probably has to do with growing up in Chicago, that not counting Lake Michigan, is in the middle of the country and far from the coast.

Since growing up I've learned to love more seafood, although salmon is still just downright icky.  I actually prefer sushi over most cooked fishes.  After not having much of it growing up too, go figure.

Now that you've heard my spiel about how fish was not a part of my household growing up, let me share with you my Gorton's healthy recipe for Shrimp Scampi Wontons.  I had the hardest time finding Gorton's new smarter options line of fish.  Either the stores in my area didn't carry it or they were sold out.  I ended up adapting a recipe on their site to make these.  My wontons are a healthy alternative as they are baked and not fried.  Due to being baked the wontons do get crispy, but don't truly turn a golden brown

Shrimp Scampi Wontons

1 (12 oz.) Gorton's Garlic Butter Shrimp Scampi
1 1/2 teaspoons olive oil
1/3 cup fresh mushrooms, chopped
1/3 cup onion, chopped
1/3 cup carrot, finely chopped
1/3 cup fresh cilantro, chopped
1 1/2 tablespoon sauce from shrimp
32 wonton wrappers

Prepare Gorton's Garlic Butter Shrimp Scampi according to package directions.  Allow to cool.

Heat oven to 350 degrees.  Line two shallow metal baking pans with parchment paper or spray lightly with nonstick cooking spray.

Add oil, mushrooms, onion and carrots to a large skillet.  Cook over medium heat for 6-8 minutes, stirring occasionally, until vegetables are slightly soft.

Blend cooked Gorton's Shrimp Scampi, vegetables, cilantro and garlic butter sauce (reserve rest of sauce) in a blender or food processor until chopped.

Place a heaping teaspoon of shrimp mixture in the middle of a wonton wrapper.  Brush the edges of wrapper with water.  Fold wrapper in half to form a rectangle or triangle and crimp edges tightly together.  Place wonton on prepared baking pan.  Repeat with remaining shrimp mixture and wonton wrappers.

Bake wontons for 10-16 minutes, turning wontons over halfway through cooking time.  Serve with reserved scampi sauce if desired.

Onto the giveaway!  Three (3) lucky readers will win a Gorton's $2 off coupon and an Eat Sea Food Twice a Week plate.  To enter the giveaway, leave a comment below telling me which Gorton's Seafood Recipe you'd like to try.  Contest is open to US readers and will run 10/30 thru 11/10.

*I was given this product for review.  All opinions are my own.*

Nielsen-Massey Field Trip Today!

This morning we're off on a field trip to Nielsen-Massey.  Do you know what Nielsen-Massey does?  They've been making amazing vanilla and other extracts for the past 100 years.  Right here in the Chicago area.  

We're seeing celebrity UK Chef Eric Lanlard, who's going to be doing a demo with the French Pastry School.  Then we're touring the factory and meeting a Nielsen.  I'm super excited!!

I hope I'll be able to take photos to share with y'all later!

Wednesday, October 24, 2012

Wholesome Wednesday: Strawberry Cream Cheese Coffeecake


Ever since I tried the french apple pastry I've been meaning to branch out into other flavors.  Cause at my house we've always loved pastries/coffeecakes.  My dad's parents always had pastries or coffeecakes at their house.  Kringles were a big favorite and they'd get several at once.

While I haven't quite advanced to Kringles, this strawberry cream cheese coffee cake is a good alternative.  It's even better that it has hardly any sugar in it.  But it tastes like a truly decadent pastry.

Strawberry Cream Cheese Coffee Cake

1/4 cup unsalted butter

2 cup flour
2 tablespoons granulated sugar
1/2 teaspoon salt
1/2 cup cold milk
2 egg yolks, beaten with a fork
1 oz compressed yeast (combined with 1 tablespoon granulated sugar) or 1 pkg dry yeast with 1/4 cup water.  If using dry yeast reduce amount of milk by 1/4 cupful.

1/4 cup unsalted butter to roll in dough (soft)

Cut 1/4 cup of butter through dry ingredients until it looks like a coarse meal.  Add the milk and eggs, yeast, and beat well until smooth. Turn out onto a pastry cloth and knead gently several minutes, keeping dough soft as possible, adding a little more flour if necessary.  When dough is smooth, roll it to measure about 12x18 inches.  Spread 1/4 cup soft butter over 2/3 of the dough.  Fold into three, cover, and let rest in refrigerator for about one hour.

After one hour remove from refrigerator, cut through center into two pieces.   Roll each piece to measure about 8x14 inch rectangle on a piece of parchment paper.  Spread center of dough with about 1/2 of cream cheese filling and sprinkle with half of sliced strawberries.  Cut 1 1/2 inch strips on each side leaving a half inch barrier on each side of the filling.  Braid strips over filling.  Lift up carefully and place on lightly greased baking sheet.  Cover and let rest in refrigerator for about 20 minutes, not more than 30 minutes.

Bake in oven preheated at 400 degrees, for about 15-18 minutes or until golden brown.  Remove, let stand until cool, brush with lukewarm corn syrup.

Strawberry Cream Cheese Filling

1 lb strawberries, hulled and sliced
1 (8 oz.) package cream cheese
1 egg
1/4 cup granulated sugar
1/2 teaspoon vanilla

Slice strawberries and set aside.  Place rest of ingredients in a mixing bowl.  Beat till well mixed.

1/4 cup unsalted butter
2 cup flour
2 tablespoons granulated sugar
1/2 teaspoon salt
1/2 cup cold milk
2 egg yolks, beaten with a fork
1 oz compressed yeast (combined with 1 tablespoon granulated sugar) or 1 pkg dry yeast with 1/4 cup       water.  If using dry yeast reduce amount of milk by 1/4 cupful.

1/4 cup unsalted butter to roll in dough (soft)

Cut 1/4 cup of butter through dry ingredients until it looks like a coarse meal.  Add the milk and eggs, yeast, and beat well until smooth. Turn out onto a pastry cloth and knead gently several minutes, keeping dough soft as possible, adding a little more flour if necessary.  When dough is smooth, roll it to measure about 12x18 inches.  Spread 1/4 cup soft butter over 2/3 of the dough.  Fold into three, cover, and let rest in refrigerator for about one hour.  After one hour remove from refrigerator, cut through center into two pieces.   Roll each piece to measure about 8x14 inch rectangle.  Spread center of dough with about 1/2 cup of filling. Tun over to enclose filling.  Cut as desired or leave plain. Lift up carefully and place on lightly greased baking sheet.  Cover and let rest in refrigerator for about 20 minutes, not more than 30 minutes.  Bake in oven preheated at 400 degrees, for about 15-18 minutes or until golden brown.  Remove, let stand until cool, brush with lukewarm corn syrup, drizzle with Coffee Cake Icing and sprinkle with nuts if desired.

Susie Savors: This coffeecake is extra moist.  The filling is a balanced combination of berry to cheese.  The sweet is cut by the savory.  The pastry is moist even on the second or third day.  It's not likely to make it past the third day.  A crowd pleasing coffeecake that looks intricate with it's woven top, but is essentially a simple way to start your day.

Beautiful Beasties: A Creative Guide to Moder Pet Photography Book


Recently I got this awesome pet photography book, Beautiful Beasties.  Before I became a blogger I was never quite interested in photography.  I wasn't one of those kids that grew up with a camera in their face at every turn.  My parents weren't actively documenting my childhood in that way.  So I never had much interest.

However, if you blog, you need awesome photos.  Attention getting photos.  Photos that make strangers click on them to see what you might have written to go with the photos.  My food photos are getting to this level, thanks to my photography class through Social Fabric.

My pet photos are another story.  It's extremely hard to get a photo of your pet when they're doing something interesting.  This book, Beautiful Beasties, will teach you how to get a great pet photo.

Here's an example of us trying it with Seven.  It's a definite improvement over anything we've taken in the past.
Can you spot the cat?  :)
Now, I understand a bit more about capturing those moments.  With this book I learned some tricks about engaging your pet to get great photos.  I can now tailor my photo shoots with my pets to get high quality pictures.  The lighting and settings on the camera can be utilized to work with your pet.  The entire process is included from what you should bring when planning a pet photo to how to work your camera.  There is a handy chapter on fixing common errors like blurry photos and other pet related photo fiascoes.  Overall,  a detailed guide to catching the best of your pets no matter the circumstances.

Besides being lucky enough to get to review this book, I'm able to give one away to a lucky reader.

To enter:  Leave a comment telling me what is your biggest challenge when photographing your pets?

Contest is open to both US and Canada.  Contest will run October 24th through October 31st.

*I was sent this product for review.  All opinions are my own.*

Win a House

Sunday, October 21, 2012

Glade Expressions Collection

Recently we got the chance to try out the new Glade Expressions collection.  Now I'm picky about anything scented because a lot of it is so strong and gives me migraines.  Needless to say I was skeptical that I would like the new glade products due to that.

I picked the pineapple and mangosteen fragrance because I've always liked anything pineapple.  Surprising enough the oil diffuser isn't very strong at all.  It gives off just enough of a scent that you notice it but it isn't at all overpowering.  It also didn't cause any migraines.  :)  So it's win in my book.  I don't care one way or the other for the spray as I rarely use that kind of thing anyway.

If you're on the lookout for a stylish oil diffuser, definitely try out the Glade Expressions collection.

*I'm a bzzagent.  I received these products for review.  All opinions are my own.*

Friday, October 19, 2012

Organic Valley American Cheese Sampling!


This afternoon we headed over to the Whole Foods in Schaumburg because Organic Valley was there sampling their new American cheese.  They're serving it up in toasted cheese sandwiches.  It tastes amazing!  Much better than the processed stuff you grew up with.

You can also get a fancy photo taken.  I chose to lift up a cow with one finger!  That's probably the only time I'll ever get a photo like this.

If you're not busy this weekend, Organic Valley is going to be in the following locations:

Saturday October 20, 2012

Whole Foods Naperville  10:30 am - 1:30 pm

Brookhaven Marketplace in Burr Ridge  3:00 pm - 6:00 pm

Sunday October 21, 2012

Whole Foods Market South Loop Chicago 11:00 am - 2:00 pm

Definitely stop by to say hi and have some amazing grilled cheese sandwiches.  Jason was doing photos when we were there and he was awesome!   From what I can tell online these look like the last stops on the tour.

Wednesday, October 17, 2012

Calling all foodies!

Photo from Groupon
The Chicago Cooking Expo is going to be at Arlington Park next weekend!!  Which totally rocks because its practically in my backyard.  So needless to say, we're going.  We won't be there as in having a booth, but going to check everything out.  

So if you're a food enthusiast, this is definitely the place to be next weekend!


Wholesome Wednesday: Carrots with a Twist Recipe


Thought y'all might like last week's Carrots with a Twist recipe from my Cool Whip Frosting post.  The recipe actually comes from a Cake Mix doctor newsletter I saw years ago.  It's incredibly easy to throw together and your family will love it.

Carrots with a Twist

1 package (18.25 oz.) plain yellow cake mix
1 package (3.4 oz.) instant vanilla pudding mix
2/3 cup fresh orange juice
1/2 cup vegetable oil
4 large eggs
2 teaspoons ground cinnamon
3 cups (about 5 medium) grated carrots
1/2 cup raisins
1/2 cup chopped walnuts or pecans

Preheat oven to 350 degrees.  Grease 2 round cake pans.  I use nine inch pans.

Put cake mix, pudding mix, orange juice, oil, eggs and cinnamon in a mixing bowl.  Beat for 2 minutes on medium speed.  Batter should be thick.  Fold in carrots, raisins and nuts.  Divide batter between pans.

Bake till golden brown and cake springs back when pressed with a finger, about 30-35 minutes.  Cool in pans for 10 minutes.  Remove and allow to cool on wire racks for 30 minutes before frosting.

Didn't I tell you it was easy?  The cake turns out amazingly dense and moist.  It's been our fave carrot cake for years now.

Saturday, October 13, 2012

Is your candy Unreal?


What is Unreal you might ask?  It's a new brand of candy that doesn't contain any of those additives that aren't good for you.  You know the ones I mean, they're also the ones that are hard to pronounce.  Unreal candy uses real ingredients to produce a real product.  So you won't have to worry about your family indulging with it.

We decided to have a chili bar with a movie screening and brownie sundaes with Unreal candy toppings for dessert.  I made my absolute favorite almost paleo chocolate chili with black Angus chuck instead of boring old ground beef.  I slow cooked it all day, it was fall apart delish by the time of the party.  Along with fixings for chili I also made some buttermilk cheddar biscuits from the 11/12 issue of Rachel Ray.  They weren't a big hit at all.  I definitely don't recommend them.

I'm getting off topic again.  *sigh*  The candy was a big hit with everyone.  The colors on the Unreal candy coated chocolates (think M&M's) were a little different.  They aren't as vibrant as the name brand because Unreal uses natural dyes to produce them.  All of the candies had a more real chocolate flavor without all the extraneous ingredients.

If you're still on the lookout for a great Halloween treat...I definitely recommend picking up some Unreal candy to give out to your trick or treaters.  :)

*This is a sponsored post.  All opinions are my own*

Friday, October 12, 2012

Carrots With a Twist #CoolWhipFrosting

We LOVE Carrot Cake!  #CoolWhipFrosting
Alison:  If you've visited our blog before, you know that we never need a reason to have a special treat.  We pretty much have them all the time.  We're probably having more treats than you think because we don't share all of them here.

Susie: I know not of which you speak.  Shhhhhhh.  They are listening...

Alison:  Oh geez, what is wrong with you?

Susie: There's still cake left...shhh.  They might come find us and our cake.  Have you no love of cake?  Protect the cake!

Alison:  Back to what I was saying, I had to go to Walmart without you to look for #CoolWhipFrosting.  Due to the fact that you were sleeping, again.
Vanilla #CoolWhipFrosting
Susie: Shopping is detestable. Besides you take for-ever when you go to the store.

Alison:  Well someone has to buy things like groceries and clothes.  We're getting off topic again.  Did you even know Cool Whip made frosting?  Apparently its a new product.  I had to call several stores before I found one in the area that carried it.  The Walmart I went to didn't even carry all three flavors.  They had chocolate and vanilla but no cream cheese.  Which kinda sucked cause I was hoping to put cream cheese frosting on my carrot cake.  But we went with vanilla instead.

Susie:  You should have gotten chocolate.  There was no choice.  Only chocolate.  You fail.

Alison:  Chocolate frosting on carrot cake?  I'm not too sure about that.

Susie:   Madness.  Chocolate + Anything = Yummy

Alison: Sounds a little too strange for me.  Besides chocolate with carrots, raisins, walnuts and orange?  That sounds icky.  I'll make something chocolate the next time I make a treat.  Besides everyone loves this carrot cake.
Carrot Cake Ingredients #CoolWhipFrosting
Look at all the yummy things that go in the carrot cake.  I know vanilla isn't your favorite, but you love carrots, walnuts and raisins.  The batter is so thick.
Carrot Cake Batter ready for the oven.  #CoolWhipFrosting
Susie:  Hmmm, you may continue.  But I expect chocolate in my future.

Alison:  Uh-huh, ignoring that; this cake always turns out perfectly.  I never need to flatten out the layers before I frost it.  Talking about frosting, its a good thing I bought two Cool Whip frostings.  Even though the package said it was enough to frost a two layer nine inch cake, one container only frosted the bottom layer and most of the sides.  It took almost another half of a container to completely frost the cake.
Full Frosted Carrot Cake #CoolWhipFrosting
Susie:  It did take a lot of frosting to fully frost the cake.  Those walnuts do make it look more appealing.  So when are you going to cut it?

Alison:  You'll have to have yours later.  You'll be sleeping by the time we cut it.  Mom will probably get to have a piece before you.
Great afternoon for a special treat with #CoolWhipFrosting!
Susie:  Figures.  I even helped frost it.  I put the walnuts on top too.  Seven and I will have a big piece when I get up.  Carrot cake is breakfast food.  Healthy and all.

Alison:  See you'll get to have it for breakfast.  That's even better than right before bed.  A better way to start the day!

Susie:  You're just saying that cause I can't have any right now.

Alison:  That's not true.  You know cake for breakfast is better than anything else you could have.

Susie:  I guess so, but I still feel like you're tricking me.

Alison: *sigh*  I'm not tricking you.  It just isn't ready right now.  You can also find recipe ideas at Kraft Recipes.  There is also going to be a #CoolWhipFrosting twitter party on Wednesday October 24th at 1 pm EST.

Slice of Carrot Cake #CoolWhipFrosting
I quite like this frosting.  The taste is a mix of Cool Whip and butter cream frosting.  It's light and fluffy but has a very rich taste.  A definite change from any frosting out there on the market.

There is a whole photo album of our shopping trip here on Google+.

I am a member of the Collective Bias™ Social Fabric® Community.  This content has been compensated as part of a social shopper insights study for Collective Bias™ and Kraft Cool Whip.  #CoolWhipFrosting #CBias #SocialFabric All opinions are my own.


Monday, October 8, 2012

Chocolate Strawberry Curd Recipe


Do you know what's better than regular old strawberry curd?  Chocolate strawberry curd!

Even more awesome is the fact that the chocolate in this recipe doesn't have any guilt attached to it.  You did read that right, absolutely no guilt!  Capella Flavor Drops are becoming one of my absolutely favorite baking things.  With these drops I don't have to sacrifice calories to have amazing flavor.

If you're reading this and live in the NW suburbs of Chicago run right out to Valli by Tuesday 10/9 to pick up some $.99 strawberries.  That not only makes this recipe guilt-free but also frugal!


Chocolate Strawberry Curd
1 pound hulled and sliced strawberries
1/2 cup sugar
2 tablespoons cornstarch
1 tablespoon lemon juice
3 large egg yolks
1/4 cup unsalted butter, cut into pieces
12 Double Chocolate Capella Flavor Drops

In a food processor or blender pulse the strawberries till smooth.  Use a food mill to strain out the seeds.  (Food mills are my new fave thing.  It takes no time at all to get the seeds out of berries.  If you do a lot berry purees you should definitely pick one of these up.)

In a heavy saucepan, combine sugar and cornstarch.  Add strawberry puree, lemon juice and egg yolks.  Whisk well.  Cook over medium heat for 7-8 minutes or until very thick, whisking constantly.

Remove from heat.  Gradually add butter, whisking until melted.  Add 12 double chocolate Capella flavor drops, whisk to incorporate.  Let cool.  Place in jar and refrigerate.

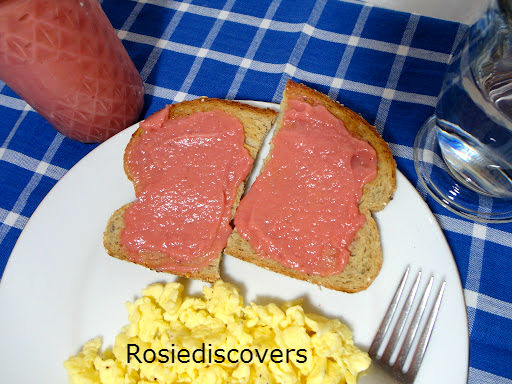
Susie Savors: Curd is better than jam or jelly.  The moisture is sealed into the mix.  It won't be an inconsistent texture.  The flavor of chocolate strawberry curd could even rival anything else on my breakfast toast.  The chocolate flavor adds complexity over the simple strawberry alone.  There is sweet from the strawberry and a subtle undertone of dark mellow chocolate to cut through it.  A balance of flavor that strikes the tongue as not too sweet and not too mellow.

*This is a sponsored post.  All opinions are my own.*

Thursday, October 4, 2012

Spiked Caramel Apple Cider Recipe


Nothing says fall to me like a hot caramel apple cider.  The caramel makes the apple cider buttery and the perfect fall drink.  That and I just love everything with caramel in it.

I thought to myself what could make it better?  Enter Spicebox whisky.  A shot of this whiskey perfectly compliments the caramel apple cider.  I decided to top it with some whipped cream, a dusting of cinnamon and a cinnamon stick.

Spiked Caramel Apple Cider

1 ounce caramel or 4 Kraft caramels
1 (8 ounces) cup real refrigerated apple cider
dash of cinnamon
1 ounce Spicebox whisky
whipped cream
cinnamon stick

Heat cider in either a saucepan or the microwave.  Add caramel and stir to melt/combine.  Add a dash of cinnamon, stir.  Pour Spicebox into a glass and add caramel apple cider.  Top with whipped cream, sprinkle of cinnamon and a cinnamon stick.

Susie Savors: This is a whiskey drink that coated my tongue in fall flavors.  The Spicebox whisky is an excellent flavor pairing with apple cider.  The spices enhance each other and add extra layers of flavor.  Served warm it really can take away the chill of a fall day and replace it with a fierce dose of spices.  Also, the astringent sting of alcohol was gone and replaced by a warm coating of apples.

*This is a sponsored post.  All of my opinions are my own*

Ttowa in Arlington Heights


Today I'm going to share with you about a wonderful restaurant in downtown Arlington Heights.  Ttowa is a Korean restaurant located across the street from the Vail Street Jewel.  It's not a large restaurant, but oh my goodness is the food amazing.  :)

If you've never tried Korean food you're in for a treat.  It's wonderfully tasty and healthy too.  Everything I've had there is amazingly fresh and flavorful.  My sister actually turned me onto Korean food.  She had a Korean roommate in college and was exposed to it.  It's one of the few things we've yet to try to make at home, but its on the list of things to try.  Partly because Korean food is healthy in that they use a lot of vegetables.  We can always have more vegetables in our diet and the tastier the better.

I had lunch at Ttowa tuesday and when I mentioned I was going to write about them they brought me out this gorgeous appetizer.  It's called Dak Bun (Steamed Spicy Fire Chicken Bun) which has cucumber, beets and korean chili paste.  Besides how eye-catching they are these tasted so good.  Dak Buns have a definite spicy heat to them, but the combination of cucumbers, beets and spices make your mouth do the happy dance.

Ttowa has an awesome lunch menu.  I normally get a Bulgogi (marinated rib eye) rice bowl with a massive bowl of chicken noodle soup.  The bulgogi is incredibly fall apart tender.  The flavor is a typical Korean barbecue marinade.  It's tangy and a little sweet, but not spicy. The soup always comes out piping hot and I love that it has those super long noodles.  Another thing you get with lunch are these yummy orange yogurt drinks for dessert.  They taste just like an orange creamsicle!

The service at Ttowa is always very friendly and quick.  The atmosphere is nice too.  Tables are spaced well.  I also love the bottles they leave on the table for water.  If you go, then you should try some of their mandoo.  Mandoo are dumplings and come in a variety of flavors sort of like egg rolls with different fillings.  Mandoo are the first Korean food my sister shared with me.

All in all I just love everything they have there.  It's always a treat to stop in for a great lunch or dinner.  If you're looking to try a new restaurant in Arlington Heights, Ttowa should be at the top of your list.


Wednesday, October 3, 2012

Strawberry Margarita Roll Recipe


I have the most amazing recipe to share with y'all.  Remember those lemon clover rolls I made?  Well.....now they're even more awesome.  I thought why couldn't you have a roll that tasted like a strawberry margarita?  Cause that would totally rock!  Well now you can!

These rolls work because the lime juice activates the baking soda to make them rise.  They get the strawberry flavor from Capella Flavor Drops.  When you combine everything you get the taste of a strawberry margarita in a roll!  Which you can have for breakfast!  How often do you get to say you had a strawberry margarita for breakfast?

Strawberry Margarita Rolls

2 cups flour
3/4 teaspoon baking soda
1/2 teaspoon salt
1/4 cup sugar
1/3 cup shortening
1/2 cup whole milk
4 tablespoons lime juice
6 drops Capella Flavor Drops Strawberry

Whisk flour, baking soda, sugar and salt in a large bowl.  Cut or rub shortening into flour mixture using a pastry cutter, until it resembles coarse meal.  Combine milk, lime juice and Capella drops in another bowl.  Add to flour mixture and stir quickly to form a soft dough.  Turn out onto a lightly floured board.  Knead slightly.  Split dough into 12 equal portions.  Split each of these into three.  Roll each piece into small balls.  Place three each into a single greased muffin tin.

Bake at 450 degrees for 12-14 minutes.  For a glaze, remove from oven and while still in the pan wash with heavy cream.  Makes 12 rolls.

Susie Savors: These are the perfect sized rolls.  No matter how you like to eat them whole or one section at a time, they're delicious.  This flavor is an improvement over the lemon.  Although, you could add any flavor to them.  The strawberry margarita is a nice way to add pizzazz to your morning.

*This is a sponsored post.  All of my opinions are my own*

Wholesome Wednesday: Pretzel Buns Recipe


No matter how hard I tried last week, Wholesome Wednesday was not meant to be.  For the life of me I couldn't get it done.  I'm sorry.  :(  I've been busy with a lot of behind the scenes blogging things.

Yesterday inspiration struck though.  The both of us had this taste for pretzels and thought why not make pretzel rolls??  So my sister googled some recipes and this is the one we found from My Life as a Mrs..  Salted Pretzel Rolls sounded just like what we needed.  From the blog post I figured they'd make excellent buns for burgers, which made us want to make them even more.

I did cheat and use the bread machine though.  I've found that no matter how proficient a baker I am, the bread machine always makes perfect dough.  ALWAYS.  I'm so glad we have one.  When I do instructions it will be as if for a bread machine.  If you want to make the dough by hand, by all means check the link above for those instructions.

These were chewy on the outside, soft on the inside and just salty enough to make an awesome pretzel roll.  The pretzel buns were the perfect size for burgers too.

Pretzel Buns

1 1/2 cup water
4 tablespoons butter
2 teaspoons kosher salt
4 1/2 cups flour
2 teaspoons sugar
1 package active dry yeast

1/4 cup baking soda
1 whole egg, lightly beaten
kosher salt

In your bread machine add the ingredients in the order listed, starting with water and adding the yeast last.  Set the bread machine to the dough cycle and turn it on.  Standing by with a scraper make sure dough isn't too dry.  If you still see loose flour on the bottom, drizzle in extra water till all ingredients are incorporated.

Line a large baking sheet with parchment paper and set aside.  Remove dough from bread machine and place on a lightly floured surface.  Lightly knead dough to remove bubbles.  Cut the dough into 8 equal portions.  To shape the dough, take a piece of dough and start forming a round, smooth ball by pulling the sides of the dough to the center and pinching to seal.  Place the pinched side down on your palm and using your other hand roll the ball around lightly.  This helps to round the dough out and also make the seal stronger.

Place the ball on the prepared baking sheet seam side down, with at least 1 inch between each roll. Cover with a towel and allow to rest in a warm place for 30 minutes or until doubled in size.

Preheat oven to 425 degrees and place oven rack in middle position.  In a large pot, bring 2 quarts of water to a low boil.  Remove from heat and slowly add the baking soda (it will bubble a lot, hence the big pot) place back on the heat and lower to a simmer.

Place 2 rolls at a time in the water, seam side down.  Boil for 30 seconds per side.  Remove with a slotted spoon to the same parchment lined baking pan.  Repeat with remaining rolls.

Using a pastry brush, brush each roll with beaten egg, making sure to coat all sides completely and then sprinkle lightly with kosher salt.  Use a sharp knife to slash rolls if desired.  Bake rolls 15-20 minutes.

Tuesday, October 2, 2012

Another Nifty Balloon Arrangement at the AHML


At the library again today, I tend to be there several times a week.  We're really big readers over here.  :)

Anyway, while at the library this afternoon there was another awesome balloon flower arrangement at the checkout desk.  Instead of taking home a flower this time I snapped a photo of the entire arrangement.  Isn't this the neatest?  There is more skill than one might think in doing balloon arrangements like this.  I think its awesome that someone takes the time to make these for the library.

FYI: You shouldn't be talking to people while trying to take a photo for your blog.  :(  That's why this one is slightly blurred.

Green Coffee Extract

We were lucky enough to get to try Raspberry Ketones recently (we're still taking them).  While they're working, really and truly working, Dr. Oz also recommended taking Green Coffee Extract.

I'm thrilled to say we're going to give the Green Coffee Extract a whirl too.  It's easy to take.  Apparently all you have to do is take 400 mg 30 minutes before meal time.  Easy, right?  Dr. Oz also recommended keeping a food journal while taking these pills.  While you don't need to watch what you eat when you take these, the food journal is recommended because its been shown to lead to more weight loss.  We'll keep to our regular workout schedule while taking these.

So far there don't seem to be any side effects from taking the extract.  There is hardly any caffeine in the pills, so unlike when you drink coffee you won't get that jittery feeling from having too much.  It's a win/win.  No side effects and a boost in the possibility of losing some extra weight.

I'll let y'all know how we do.  :)