Wednesday, August 15, 2012

Wholesome Wednesday: Old-Fashioned Strawberry Shortcake


I've been really wanting to make a dessert in mason jars for a while now.  They're just so incredibly cute!!  And its in a jar so you can see everything that's in it and its portable.  Ummm...now I really need to calm down before I end up scaring someone.  It's probably due to all the whipped cream I just had on the strawberry shortcakes.  :)

I'm loving just about everything I'm having the urge to make out of that old Martha Meade cookbook.  The recipe actually called for bigger shortcakes, but I cut mine to fit into the jars and used two instead of one.  This allowed me to layer the shortcakes and make them seem bigger.  The rest of the recipe was easy to mix and bake.

Old-Fashioned Strawberry Shortcakes

2 cups flour
4 teaspoons baking powder
1/4 cup sugar
1 teaspoon salt
1/4 cup shortening
3/4 cup whole milk
Strawberries
Whipped Cream

Mix flour, baking powder, sugar and salt in a medium bowl.  Cut in shortening with a pastry cutter, add whole milk and mix lightly.  Turn out onto lightly floured surface, roll 1 inch thick.  Cut with biscuit cutter (I used 1 1/2 inch).  Re-roll scraps to cut 12 rounds.  Place on greased pan and bake in a hot oven, 450 degrees for 10-12 minutes.

For the strawberries I cleaned and sliced 1 1/2 pounds into a medium bowl.  Added a couple of spoonfuls of sugar.  Stir and let sit at least an hour.

For the whipped cream, I made two separate batches.  The first batch, I used 1/2 cup heavy cream, 1 tablespoon sugar and 1/2 teaspoon vanilla.  Whipped till peaks form.  Second batch, 1/2 cup heavy cream and 1/2 ounce raspberry syrup.  Whipped till peaks form.

Assembly:

Place a shortbread in bottom of mason jar.  Spoon on strawberries and juice to cover.  Plop on some plain whipped cream.  Add another shortbread pushing down slightly to flatten whipped cream.  Then spoon on some strawberries and syrup.  Finally, plop on some raspberry whipped cream.

This recipe made extra shortbread, but the strawberries and whipped cream make enough for 4 servings.

Tuesday, August 14, 2012

SoFabU: Sears Grilling Week 6 Party Time! #SoFabU #grillingishappiness

This week's assignment was to utilize all the skills we've learned in our SoFabU Sears Grilling photography class.  I was strapped for time all week as I had to head out of town the end of the week.  I didn't get to actually grill anything till Sunday night.  We didn't have a huge party just a more elaborate meal than usual.  Turns out it was a good thing we didn't have people over because when I was done cooking I ran out of propane.  Oh and did I mention it started to rain right when I went out to grill?  That foiled our plans to eat outside.

I made a variety of dishes to make a more elaborate meal.  I marinated some pork tenderloin slices in a honey lime marinade.
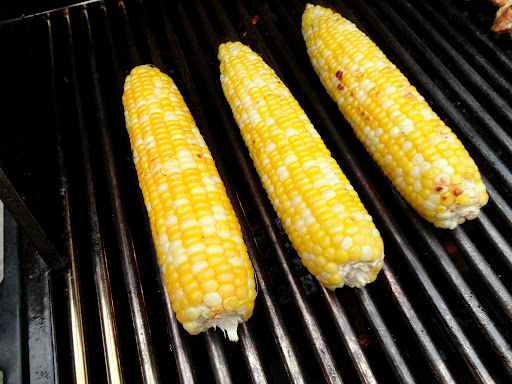
And what's a grilled meal without grilled corn on the cob?
The marinated pork tenderloin kabobs grilled perfectly.  I was worried they'd stick too much due to the marinade, but they didn't.  :)
While I like my corn grilled, I don't like it blackened.  Typically it takes about 8 minutes on the grill turning it every 2 minutes.

Like I said earlier, we got rained out Sunday night and ended up eating inside.  A lot later than usual about eight at night.  This was our feast.

The fruit salad I made was a huge hit.  Even the picky eaters didn't pick out the fruit they didn't like.  I think it was due to the dressing I made for it.

Grilled garlic cheese and herb bread was amazing and so easy to make.  Just slather spread on both sides of bread slices, put back together as a loaf, wrap in foil and grill.  The entire loaf was gone at dinner.

I absolutely love these tie dyed cupcakes.  They're so bright and cheery.  The cupcakes themselves are rainbow colored along with the frosting.

A fully balanced meal.  Fruits, veggies, meat and some bread.  Three quarters of it grilled too.  It's amazing what you can grill.

I love this close-up shot of the fruit salad on my plate.  How the picture draws your eye to the salad and the rest of the picture is blurred.

See the gorgeous rainbows inside the cupcakes?  Each one looks like this under the cupcake liner.  Check out the next picture after I took a bite.  Gorgeous right?  These are so easy to make.  Just take a white or yellow cake mix, follow mixing directions, then split into 6 bowls and color with rainbow colors (1 color per bowl) and then layer in cupcake tins.  Bake as usual.

It was great to only have to have a fancy meal this week as opposed to three meals the previous weeks.  I did spend much of Sunday prepping everything.  But I love spending time making a great meal.


Once again thanks #SoFabU and Sears for offering this wonderful class on food photography.  Because you know #grillingishappiness.  :)

Disclosure: I am a member of the Collective Bias Social Fabric Community.  This shop has been compensated as a part of a social shopper insights study for Collective Bias and Sears #CBias #GrillingIsHappiness.  All photos and opinions are my own.


Wednesday, August 8, 2012

Seattle's Best Red Cup Showdown at the Illinois State Fair

Illinois State Fair

Alison: Did you know that the Illinois State Fair starts tomorrow in Springfield?

Susie: Wait, why are you telling me?

Alison: Going to the state fair always makes me think of the musical State Fair and in particular the song "Our State Fair".  I've never been to the state fair here in Illinois.  But we're going this year.  :)

Susie: Hold up, what's this WE bit?

Alison: Well, someone has to take fabulous pictures of me at the fair!
Seattle's Best Red Cup Showdown

Alison: Did you know that Seattle's Best is going to be at the fair this weekend?

Susie:  I think you're tricking me.

Alison: They'll be there with a special exhibit August 9-11th.  Visitors to the exhibit will be able to sample iced coffee drinks with wild flavors like elephant ear lattes and cotton candy mochas.

Susie:  This is sounding better.  You mean I get to drink coffee for free?

Alison: Yes! Free coffee!  You love coffee! Especially Seattle's Best Coffee!

Susie:  Back up a sec, elephant ear latte?  Cotton candy mocha?  Um, that sounds a bit unusual.

Alison:  But that's the thing you're trying different flavors!!

Susie:  Alright, alright.  I'm willing to try it is Seattle's Best after all.

Alison:  Isn't it wonderful! Also fairgoers can get their photo taken inside a life-sized red mug, win prizes and receive a free sample of Seattle's Best coffee to brew at home.  All the information is on their facebook page.

Susie:  More coffee! You're just lucky, I love coffee.

Red Cup Showdown

Alison: Friday morning is the Red Cup Showdown hosted by Celebrity Chef and Food Network Star Jeff Mauro.

Susie: Morning! Ugh, that's too early!

Alison: Remember there'll be coffee!

Susie:  I'm listening...

Alison:  The Red Cup Showdown will be in the Hobbies, Arts and Crafts building starting at 8:30 am.  Competitors will be creating yummy coffee drinks for a chance to win up to $500 and a years worth of free coffee.   The finalists get to go on to NYC to compete for a chance to win $10,000 and have their drink on the menu at Seattle's Best shops.

Susie:  I love competition! It's going to be a nail biter!

Alison:  I'm not sure we can say that.

Susie:  You're right.  How do we know if these people bite their nails...Maybe they're hair twirlers!

Alison:  That's not exactly what I meant...moving on.  This is the part of the fair I'm really excited about. Did y'all know that I used to be a master barista?  I love the smell of a good cup of coffee almost as much as the taste.  The things I can do with or without an espresso machine would amaze you.

Susie: Amaze them?  Hey, I'm sitting right next to you! Where's my amazing cup of coffee?

Alison:  We're in the middle of a post! You have to wait!  I'm not competing in the #RedCupShowdown but I'm just as thrilled to get to see it.  I can't wait to see what recipes the competitors come up with.

Susie:  Me too, I bet they deliver when they claim to make amazing cups of coffee.  I'm still waiting you know.

Alison: You can follow the competition on twitter!

Susie:  Ooo and a clip from the Ohio State Fair!  Now, it's finally time to drink my coffee!


*I am a member of the Collective Bias Social Fabric Community.  This shop has been compensated as part of a social shopper insights study for Collective Bias and Seattle's Best Coffee #CBias #SocialFabric.  All opinions are my own.*

Wholesome Wednesday: Orange Cream Pie with Chocolate Meringue


This week's recipe is special.  I've never had a chocolate meringue before, ever.  Neither has my mom.  Which is odd if you think about it because I have and see an amazing number of cookbooks and recipes.  I knew when I saw this that I had to make it.

This recipe comes from a really old Martha Meade cookbook from the early 40's.  I actually didn't change anything as the entire recipe worked just fine.  :)  Also the pie is amazing I made it yesterday afternoon and it was gone after dinner tonight.  Definite endorsement there.

Susie Savors:  This pie ranks quite high up on the savor scale (which I may or may not just be inventing).  Honestly, this pie was airy and cool.  A perfect summer dessert.  The fluffy meringue and thick custard melt in your mouth.  The flavors of chocolate and orange meld together for a burst of freshness.  Expect a cleansed palate after a slice.  For a person that loves fresh fruit pies, I know how dense a slice can be thick with berries or peaches or apple, but this had just the right amount of substance with a kick of sweet.  Ending with a crisp pie crust and you may find yourself sneaking a second piece.

Orange Cream Pie
1/2 cup flour
3/4 cup sugar
1/4 teaspoon salt
2 egg yolks, beaten
1 1/2 cups scalded milk
1 cup orange juice
1 teaspoon grated orange rind
1/2 teaspoon vanilla
1 baked 9-inch pie shell (recipe below)

Combine flour, sugar and salt in the top of a double boiler.  Combine with egg yolks and milk.  Cook over hot water until slightly thickened.  Add orange juice and continue cooking until thick and smooth, about 20 minutes.  Remove from heat, add orange rind and vanilla.  Pour into baked pie shell, top with mounds of Chocolate Meringue and bake in a slow oven, 300 degrees, for 20 minutes.  Remove from oven and let stand, away from drafts, until cool.

Chocolate Meringue
4 tablespoons sugar
1 tablespoon cocoa
2 egg whites, stiffly beaten
3 tablespoons finely chopped nuts (I omitted these)

Add sugar and cocoa slowly to egg whites and beat until smooth.  Fold in nuts last.

Pastry Dough (enough for 1 pie shell)
1 cup flour
1/2 teaspoon salt
1/3 cup shortening
3-4 tablespoons ice cold water

Place flour, salt and shortening in medium bowl.  Using a pastry cutter, cut shortening into flour and salt until mixture is pea sized.  Add just enough water to barely hold dough together.  Turn out on a lightly floured board and roll to fit pie pan.  Fit loosely into a 9-inch pie pan, flute edges and prick bottom and sides.  Bake in a hot oven, 425 degrees, for 10 minutes.

Sunday, August 5, 2012

SoFabU: Sears Grilling Week 5 Lighting and Staging #grillingishappiness #SoFabU


If you've been following my blog you know I'm currently enrolled in a Social Fabric University class hosted by Sears to learn how to better photograph food.  The first week I talked about what I hoped to learn in this class.  The second week I shopped for a grill at Sears.  The third week I actually bought my grill and brought it home.  The fourth week was all about taking pictures of food while it was cooking on the grill.

This week, the fifth week, my assignment was to take pictures of grilled food using natural light and props.  I was a lot more comfortable doing this week's assignment because plating food for photos is something all of you have been seeing on my blog for months now.  But I have learned more about using natural light and props to take a better photo.

The best place to take a photo in your house is near a window.  Not a window that gets direct sunlight, as that will be too harsh in your photos, but one that the sun doesn't shine directly into.  At my house that's a window in my bedroom.  The window is on the side of the house and gets great indirect sunlight all day long. Which made it so much easier to take pictures.

Another thing you want to do when taking photos is to use props to make the photos more engaging.  You'll see that I've added some things in the photos below that you'd typically find around plates of food to make the pictures seem more natural.

First, I've got a "grilled" grilled cheese.  :)  I love saying that.  Anyway, I wanted to make something simpler this week so a "grilled" grilled cheese.  If you've never done this on the grill, make sure you turn the flames way, way down or you'll get a extra well done sandwich.  These tasted so much better than what you'd make in a pan.  As this was my first photo of the week I totally flaked on using any props in the photo.  But I also like the simplicity of it.
That same night we also tried sticking some s'mores in a foil packet on the top shelf of the grill.  They were kind of a bust as the chocolate never truly melted and the marshmallows got more hard than toasted.  But I loved the colors in the marshmallows. 
Second, a grilled pork chop with some fresh melon and deviled eggs.  Doesn't this picture just make you want to sit down to dinner at the table?
Here's a delightful close up of the plate.  I think these food items photographed well together.  The colors are similar and complimentary to the dark blue checked place mat.
Third, Jucy Lucy burgers and grilled potato rounds.  These were the most amazing burgers.  They stayed tender and moist.  Has everyone seen those Ore-Ida grillers?  I've been wanting to try them but figured I could do it myself.  These grilled potato rounds were super easy and taste like grilled slices of baked potatoes.
Here's a close-up of the burgers.  I've found throughout the class that I really like close up photos the best.  Doesn't the burger look tasty?
Fourth, I've got a sliced grilled London Broil, grilled corn on the cob and pan fried mushrooms and onions.  Plus a crisp, ice cold bubbly drink.  A London Broil or a top round are fantastic to either grill or broil.  They stay extremely tender and slice well for sandwiches.
A different photo of the London broil.  I like mine quite rare.  :)
While pan fried mushrooms and onions aren't my favorite food, they do look juicy here.  My sister loves them cooked best this way.  They go great on burgers or with a steak.

All in all I loved the class this week.  I'm a lot more comfortable taking photos of food on plates.  I will say all of the food in these photos is real and was eaten after being photographed.  I actually made extra of everything all week to ensure I had enough food for my photos.

Once again thanks #SoFabU and Sears for offering this wonderful class on food photography.  Because you know #grillingishappiness.  :)

Disclosure: I am a member of the Collective Bias Social Fabric Community.  This shop has been compensated as a part of a social shopper insights study for Collective Bias and Sears #CBias #GrillingIsHappiness.  All photos and opinions are my own.

Saturday, August 4, 2012

Blogher13' is going to be in Chicago!!

So I haven't been following everything that's been going on at Blogher12' this year because lets face it, it's depressing to not be there.  I know I'm a pretty new blogger but man oh man going there would be amazing. And I just found out that its going to be in Chicago in 2013!!  Can you say excited?!?!

Even though I live so close tickets are still pretty pricey.  I'll have to either save a lot or be on the lookout for a sponsor.

If you're a blogger and want to enter to win tickets you can find the website here.

*This post is being used as an entry to win tickets to Blogher13'.  All opinions are my own.*

Wednesday, August 1, 2012

Wholesome Wednesday: Fettuccine with Sausage and an Easy Egg Sauce


I did take a break from grilling last week, albeit a forced break, and tried out this recipe one night last week. I've never made a raw egg sauce in a pasta dish and now I don't know why I didn't try one sooner.  It was incredibly simple to make and the flavor was amazing.  The dish literally only took the time to prep the ingredients plus that of making pasta.  A healthy flavor bursting meal in under 30 minutes, what's not to like?

I saw this recipe originally in the Newlywed Cookbook by Sarah Copeland.  I've changed a few things which I'll note in the recipe below.  I used fettuccine because I don't typically have linguine around.  I also added 8 ounces of thinly sliced baby Bella mushrooms.  If you've noticed anything we can add mushrooms to we do.  :)

Fettuccine with Sausage and an Easy Egg Sauce

1 pound Italian sausage, I used mild Italian sausage
2 tablespoons olive oil
8 ounces baby Bella mushrooms, sliced thin
1 pound fettuccine
4 large egg yolks
1/2 cup whole milk
3/4 cup grated Parmesan
grated zest of 1 lemon
handful of fresh chives or parsley chopped

Shape raw sausage into small, rough meatballs.

Heat olive oil in large frying pan over medium high heat and fry sausages till golden brown, about 5 minutes.  When sausages look about half way done, add sliced mushrooms.  Continue to cook till both are done.

Meanwhile cook fettuccine till all dente.

Whisk together egg yolks, milk, half the grated cheese, pepper and lemon zest.  Drain pasta and reserve a 1/2 cup pasta water.  Add pasta back to pot with egg mixture.  Add hot sausage and toss it all together.  Let heat from pot and fettuccine cook and thicken sauce.  Add 1/4-1/2 cup pasta water to loosen sauce.  Toss with remaining cheese and herbs.  Serve.