Rosie loves to discover everything. From a great deal to a new recipe. Hope you like discovering things with her.
Showing posts with label recipe. Show all posts
Monday, March 11, 2013
Church Street Brewing Co. Scottish Ale Beer Bread
This beer bread post is way overdue. All I can say is being sick does not mesh well with being productive.
Here is another tantalizing beer bread recipe featuring Church Street Brewing Co.'s Scottish Ale. The Scottish Ale is a caramel and malty beer. We both loved this one and thought it would make an excellent bread. Turns out we were right! I love when that happens.
Through making countless loaves of beer bread I've learned a few tricks. One of these is to heat your beer, grain and butter to about 115-120 degrees in a saucepan on the stove. I heat up the beer mixture first and then get the rest of my ingredients ready. This way the beer mixture is just the right temperature to help activate the yeast. This also solves the previous problem of a slow rise with the beer bread.
Starting with this recipe, I'll include directions for using a bread machine to mix your dough also. Even though I can make the bread without it, I normally take advantage of how easy it makes bread baking. If you have a bread machine, I highly recommend this method as it will make your bread process much easier. :)
Church Street Scottish Ale Beer Bread
2 cups flour
1 cup bread flour
3/4 cup oatmeal flour
3/4 cup spent grains
2 1/4 teaspoons yeast
1 1/2 teaspoons salt
1/4 cup raw sugar
1 egg yolk
1 (12 oz) Church Street Brewing Co. Scottish Ale beer
2 tablespoons unsalted butter
Traditional Method: In a saucepan; combine beer, butter and spent grains. Heat on low until mixture reaches 115-120 degrees.
In a mixer add: flours, yeast, salt and sugar; mix well. Add heated beer mixture. Mix on low until dough comes together. Change to a dough hook and knead for 8-10 minutes. Dough will be extremely wet. Don't worry. :)
Form dough into a ball and place in a well oiled container or bowl. Cover with plastic wrap and allow to rise till double in size.
Bread Machine Method: In a saucepan; combine beer, butter and spent grains. Heat on low until mixture reaches 115-120 degrees. Add ingredients in order preferred by your bread machine. I add mine like this: egg yolk, salt, heated beer mixture, flours, sugar and yeast. Set bread machine to dough cycle and start mixing. *Note: I've yet to have to add any moisture to this as its a very wet dough, but I always make sure the ingredients are fully incorporated before I leave the bread machine to do its thing.*
Finishing Directions for Both Methods: Punch down dough and shape into a loaf to fit in a greased 9 x 5 inch loaf pan. Cover with a damp towel and allow to rise until double. Bake at 350 degrees for 35-40 minutes or until loaf reaches 180 degrees. Remove from oven, remove from pan and allow to cool on rack.
Thursday, November 8, 2012
Asian Flavors Diabetes Cookbook
Who doesn't love teriyaki chicken? It's one our favorite things that has been sorely missed since we moved here from Seattle. Teriyaki chicken is to Seattle what Italian beef is to Chicago. You find it everywhere and its insanely popular.
I was thrilled to see a healthy teriyaki recipe in Corinne Trang's Asian Flavors Diabetes Cookbook. While we're not diabetic, healthy recipes are always welcome in our house. Especially ones that are favorites.
Actually the entire cookbook is great. It's filled with healthy versions of your favorite Asian dishes. I love that Corinne utilizes low sodium and alternative sweeteners in her recipes. Also her recipes are easy to follow and well written.
Not only did I get to check out this great cookbook, I also have two (2) copies to giveaway to lucky readers. Contest open to US readers.
To enter the contest leave me a comment telling me what your favorite Asian dish is?
Contest will run from November 8th - November 18th.
*I was given this cookbook to review and host a giveaway. All opinions are my own.*
Wednesday, October 31, 2012
Wholesome Wednesday: Buttermilk Chocolate Bread Recipe
I have to start this post by saying I am not a fan of anything Taste of Home. I typically don't like the magazines or the cookbooks because the recipes aren't very good. If you're a big fan of Taste of Home, I'm sorry if I've offended you. That said, I look at an ungodly amount of cookbooks. We're talking stacks and stacks. I also have bookcases full of cookbooks.
This recipe comes from the new Taste of Home Best Loved Recipes cookbook. It's a massive tome, think dictionary size, arranged alphabetically by category. I thumbed through the entire book and found just a few recipes that looked promising.
I love buttermilk breads. They turn out moist and taste wonderful. They also don't require fooling around with yeast. I was hoping this bread would be more of a sandwich bread, but it was like a chocolate loaf cake. That's not at all a bad thing, just not what I was looking for. This recipe was a huge hit though. The entire loaf was gone before the very next day! Now that's a ringing endorsement!
If you need a quick chocolate dessert, definitely try this bread. You'll get rave reviews!
Buttermilk Chocolate Bread
1/2 cup butter, softened
1 cup sugar
2 eggs
1 1/2 cups flour
1/2 cup baking cocoa
1/2 teaspoon salt
1/2 teaspoon baking powder
1/2 teaspoon baking soda
1 cup buttermilk
In a large bowl, cream butter and sugar until light and fluffy. Add eggs, one at a time; beating well after each. Combine flour, cocoa, salt, baking powder, baking soda; add to creamed mixture alternately with the buttermilk.
Pour into a greased 9 x 5 inch loaf pan. Bake at 350 degrees for 55-60 minutes or until toothpick comes out clean. Cool 10 minutes in the pan before removing. Continue to cool on wire rack.
Susie Savors: The best evidence I have that this bread is delicious, is that it did not make it to the second day. Warm out of the oven, this bread functioned as hot slices of chocolate. The bread speaks for itself.
Tuesday, October 30, 2012
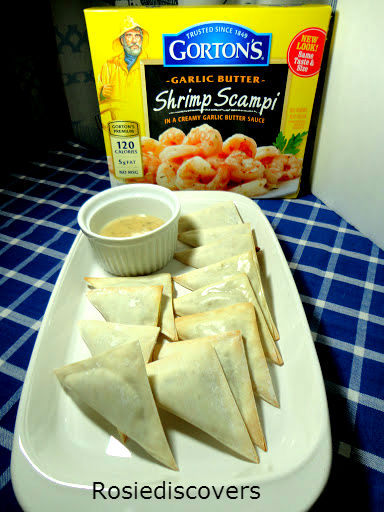
Gorton's Shrimp Scampi Wontons Recipe + Giveaway
Did you know October is National Seafood month? Well it is and I just barely am squeaking in with my post about it. :) Tomorrow is Halloween, my absolute favorite holiday, also the last day of the month. To support this Gorton's has been running a campaign all month called "Eat Seafood Twice a Week."
October being National Seafood month it's a great reason to make a change in your regular routine. Seafood is a great healthy protein meal option. One that I can say does get overlooked at my house. I didn't grow up eating a lot of seafood besides the occasional shrimp, salmon (which I detest) and canned tuna. My parents didn't really care for it. That probably has to do with growing up in Chicago, that not counting Lake Michigan, is in the middle of the country and far from the coast.
Since growing up I've learned to love more seafood, although salmon is still just downright icky. I actually prefer sushi over most cooked fishes. After not having much of it growing up too, go figure.
Now that you've heard my spiel about how fish was not a part of my household growing up, let me share with you my Gorton's healthy recipe for Shrimp Scampi Wontons. I had the hardest time finding Gorton's new smarter options line of fish. Either the stores in my area didn't carry it or they were sold out. I ended up adapting a recipe on their site to make these. My wontons are a healthy alternative as they are baked and not fried. Due to being baked the wontons do get crispy, but don't truly turn a golden brown
Shrimp Scampi Wontons
1 (12 oz.) Gorton's Garlic Butter Shrimp Scampi
1 1/2 teaspoons olive oil
1/3 cup fresh mushrooms, chopped
1/3 cup onion, chopped
1/3 cup carrot, finely chopped
1/3 cup fresh cilantro, chopped
1 1/2 tablespoon sauce from shrimp
32 wonton wrappers
Prepare Gorton's Garlic Butter Shrimp Scampi according to package directions. Allow to cool.
Heat oven to 350 degrees. Line two shallow metal baking pans with parchment paper or spray lightly with nonstick cooking spray.
Add oil, mushrooms, onion and carrots to a large skillet. Cook over medium heat for 6-8 minutes, stirring occasionally, until vegetables are slightly soft.
Blend cooked Gorton's Shrimp Scampi, vegetables, cilantro and garlic butter sauce (reserve rest of sauce) in a blender or food processor until chopped.
Place a heaping teaspoon of shrimp mixture in the middle of a wonton wrapper. Brush the edges of wrapper with water. Fold wrapper in half to form a rectangle or triangle and crimp edges tightly together. Place wonton on prepared baking pan. Repeat with remaining shrimp mixture and wonton wrappers.
Bake wontons for 10-16 minutes, turning wontons over halfway through cooking time. Serve with reserved scampi sauce if desired.
Onto the giveaway! Three (3) lucky readers will win a Gorton's $2 off coupon and an Eat Sea Food Twice a Week plate. To enter the giveaway, leave a comment below telling me which Gorton's Seafood Recipe you'd like to try. Contest is open to US readers and will run 10/30 thru 11/10.
*I was given this product for review. All opinions are my own.*
Thursday, October 4, 2012
Spiked Caramel Apple Cider Recipe
Nothing says fall to me like a hot caramel apple cider. The caramel makes the apple cider buttery and the perfect fall drink. That and I just love everything with caramel in it.
I thought to myself what could make it better? Enter Spicebox whisky. A shot of this whiskey perfectly compliments the caramel apple cider. I decided to top it with some whipped cream, a dusting of cinnamon and a cinnamon stick.
Spiked Caramel Apple Cider
1 ounce caramel or 4 Kraft caramels
1 (8 ounces) cup real refrigerated apple cider
dash of cinnamon
1 ounce Spicebox whisky
whipped cream
cinnamon stick
Heat cider in either a saucepan or the microwave. Add caramel and stir to melt/combine. Add a dash of cinnamon, stir. Pour Spicebox into a glass and add caramel apple cider. Top with whipped cream, sprinkle of cinnamon and a cinnamon stick.
Susie Savors: This is a whiskey drink that coated my tongue in fall flavors. The Spicebox whisky is an excellent flavor pairing with apple cider. The spices enhance each other and add extra layers of flavor. Served warm it really can take away the chill of a fall day and replace it with a fierce dose of spices. Also, the astringent sting of alcohol was gone and replaced by a warm coating of apples.
*This is a sponsored post. All of my opinions are my own*
Wednesday, October 3, 2012
Strawberry Margarita Roll Recipe
I have the most amazing recipe to share with y'all. Remember those lemon clover rolls I made? Well.....now they're even more awesome. I thought why couldn't you have a roll that tasted like a strawberry margarita? Cause that would totally rock! Well now you can!
These rolls work because the lime juice activates the baking soda to make them rise. They get the strawberry flavor from Capella Flavor Drops. When you combine everything you get the taste of a strawberry margarita in a roll! Which you can have for breakfast! How often do you get to say you had a strawberry margarita for breakfast?
Strawberry Margarita Rolls
2 cups flour
3/4 teaspoon baking soda
1/2 teaspoon salt
1/4 cup sugar
1/3 cup shortening
1/2 cup whole milk
4 tablespoons lime juice
6 drops Capella Flavor Drops Strawberry
Whisk flour, baking soda, sugar and salt in a large bowl. Cut or rub shortening into flour mixture using a pastry cutter, until it resembles coarse meal. Combine milk, lime juice and Capella drops in another bowl. Add to flour mixture and stir quickly to form a soft dough. Turn out onto a lightly floured board. Knead slightly. Split dough into 12 equal portions. Split each of these into three. Roll each piece into small balls. Place three each into a single greased muffin tin.
Bake at 450 degrees for 12-14 minutes. For a glaze, remove from oven and while still in the pan wash with heavy cream. Makes 12 rolls.
Susie Savors: These are the perfect sized rolls. No matter how you like to eat them whole or one section at a time, they're delicious. This flavor is an improvement over the lemon. Although, you could add any flavor to them. The strawberry margarita is a nice way to add pizzazz to your morning.
*This is a sponsored post. All of my opinions are my own*
Wholesome Wednesday: Pretzel Buns Recipe
No matter how hard I tried last week, Wholesome Wednesday was not meant to be. For the life of me I couldn't get it done. I'm sorry. :( I've been busy with a lot of behind the scenes blogging things.
Yesterday inspiration struck though. The both of us had this taste for pretzels and thought why not make pretzel rolls?? So my sister googled some recipes and this is the one we found from My Life as a Mrs.. Salted Pretzel Rolls sounded just like what we needed. From the blog post I figured they'd make excellent buns for burgers, which made us want to make them even more.
I did cheat and use the bread machine though. I've found that no matter how proficient a baker I am, the bread machine always makes perfect dough. ALWAYS. I'm so glad we have one. When I do instructions it will be as if for a bread machine. If you want to make the dough by hand, by all means check the link above for those instructions.
These were chewy on the outside, soft on the inside and just salty enough to make an awesome pretzel roll. The pretzel buns were the perfect size for burgers too.
Pretzel Buns
1 1/2 cup water
4 tablespoons butter
2 teaspoons kosher salt
4 1/2 cups flour
2 teaspoons sugar
1 package active dry yeast
1/4 cup baking soda
1 whole egg, lightly beaten
kosher salt
In your bread machine add the ingredients in the order listed, starting with water and adding the yeast last. Set the bread machine to the dough cycle and turn it on. Standing by with a scraper make sure dough isn't too dry. If you still see loose flour on the bottom, drizzle in extra water till all ingredients are incorporated.
Line a large baking sheet with parchment paper and set aside. Remove dough from bread machine and place on a lightly floured surface. Lightly knead dough to remove bubbles. Cut the dough into 8 equal portions. To shape the dough, take a piece of dough and start forming a round, smooth ball by pulling the sides of the dough to the center and pinching to seal. Place the pinched side down on your palm and using your other hand roll the ball around lightly. This helps to round the dough out and also make the seal stronger.
Place the ball on the prepared baking sheet seam side down, with at least 1 inch between each roll. Cover with a towel and allow to rest in a warm place for 30 minutes or until doubled in size.
Preheat oven to 425 degrees and place oven rack in middle position. In a large pot, bring 2 quarts of water to a low boil. Remove from heat and slowly add the baking soda (it will bubble a lot, hence the big pot) place back on the heat and lower to a simmer.
Place 2 rolls at a time in the water, seam side down. Boil for 30 seconds per side. Remove with a slotted spoon to the same parchment lined baking pan. Repeat with remaining rolls.
Using a pastry brush, brush each roll with beaten egg, making sure to coat all sides completely and then sprinkle lightly with kosher salt. Use a sharp knife to slash rolls if desired. Bake rolls 15-20 minutes.
Wednesday, September 26, 2012
Boozy Peanut Butter Cup Recipe
Is there truly anything better than peanut butter and chocolate? How about if you add coffee and vodka? I don't know if better is exactly the right word. The coffee and vodka enhances the chocolate and peanut butter. Or ultimately a yummy frozen boozy treat.
This drink has Lulu B. Chocolate Martini, Reese's Peanut Butter Cups, coffee and Capella Flavor Drops. Using Lulu B. Chocolate Martini and Capella flavor drops are a great way to enjoy a cocktail with less guilt than a regular cocktail.
Boozy Peanut Butter Cup
1 ounce Lulu B. Chocolate Martini
1 scant cup crushed ice
1 1/2 ounces coffee or espresso
2 teaspoons vanilla instant pudding powder
2 Reese's Peanut Butter Cups
1 ounce heavy cream
3 drops Peanut Butter Capella Flavor Drops
3 drops Double Chocolate Capella Flavor Drops
2 drops Espresso Capella Flavor Drops
Put all ingredients in a blender. Blend till slushy. Pour into two glasses and serve.
Susie Savors: Peanut butter and chocolate is our favorite. Hands down. This is just a bit of happiness in a cup. Quite literally, if you drink a few you will be feeling better. This is by far our favorite type of drink, tastes so good you think you're not consuming alcohol. The burn is completely gone and all you have left is the flavor of the chocolate vodka.
*This is a sponsored post. All opinions and thoughts are my own.*
Monday, September 24, 2012
Healthy Nutty-Ella Baked Oatmeal Recipe
Y'all already know how much we love baked oatmeal at my house. It's absolutely amazing. You can make extra and easily heat it up in the microwave and its just as amazing as if it just came fresh from the oven. I have an extra special treat in this recipe. Capella Flavor Drops!
What are Capella Flavor Drops you ask? They're a great way to add amazing flavor to anything you make. I'm going to be bringing you quite a few recipes featuring these powerhouse drops. You literally only add a drop at a time to flavor whatever you're doing. They are honestly that concentrated. If you're at all like me, flavor is important to you, but you also want to watch what you're eating. These drops are a great way to do this as they have no fat, no carbs, no gluten, no calories and no sugar. That means they won't actually alter anything but flavor in your recipes.
The first thing that popped into my mind when I got the opportunity to use these drops was to make a healthy nutella-like baked oatmeal. Nutella is a big fave at my house (some people have been known to hide it away so they don't have to share). While I love nutella and hazelnuts are good for you, I don't love all the fat that comes with it. I thought using these drops would be a great way to bring that taste to a baked oatmeal. I've also added some butter flavored drops as there isn't really any fat in this recipe and they give it the illusion of being a rich treat.
This recipe makes 2 servings. I typically bake mine in one cup ramekins. I split the recipe between 4 of them because then you don't have to have an entire serving if you'd like to diversify you're breakfast. You could easily half this recipe to make just one serving or bake it in a bigger dish. Another note, you can use whatever liquid you like in this recipe. I've used coconut milk, almond milk, milk and coffee creamer with great results each time.
Healthy Nutty-Ella Baked Oatmeal
1 cup oats (I use old fashioned)
1/2 teaspoon vanilla
1/2 cup unsweetened applesauce
1/2 cup milk, water, liquid
dash of salt
1-2 tablespoons of sugar or coconut sugar
2 drops Butter Capella Flavor Drops
2 drops Double Chocolate Capella Flavor Drops
2 drops Hazelnut Capella Flavor Drops
Preheat oven to 375 degrees. Combine all ingredients in a medium bowl. Pour into greased baking dish or ramekins. Bake for 20 minutes or until firm. Broil on high for 3-4 minutes. Remove from oven. Allow to cool for at least 5 minutes before serving.
Susie Savors: I'm still not telling you where my Nutella stash is. But, this is a good substitute. Not exactly the same melt in your mouth textures, but for being oatmeal it's a pass. Plus with the drops we can control the flavors so there is no overload of one flavor over another.
*This is a sponsored post. All opinions and content are my own.*
Thursday, September 20, 2012
Wholesome Wednesday: Quick Plum Jam Recipe
Did everyone see my plumarita? I basically made a quick plum jam to flavor the drink. Which made it taste amazing. :) I thought why not use the same recipe but increase it to make a quick plum jam!
I toyed around with an old tollhouse biscuit recipe on Tuesday morning, but the result wasn't pretty. Just let me say the biscuits looked like crusted bloody eyeballs. Great for Halloween, but not at all what I was going for. A bit under the weather this week, so Wednesday's post is a tad late.
The plum jam is so easy to make. The color is fabulous and it tastes fresh and not at all plummy. :) Not everyone in my house is a fan of plums, but the jam went over fairly well. I will warn you that I like things tart when it comes to fruit, so if you want a sweeter jam by all means add more sugar.
Quick Plum Jam
3 ripe black plums, pits removed and roughly chopped
2 tablespoons sugar
3/4 cup water
Place all in a medium saucepan. Bring to a boil and then simmer until fruit is soft and juices thicken. Let cool slightly. Use either a food mill or fine mesh sieve to strain mixture. Serve immediately or store in refrigerator.
Susie Savors: This one is not my favorite recipe, but it's alright. I'm not the greatest fan of plums but this is palatable even for me. It really is tart, but that adds the extra kick in the morning. I had some on my toast and I was wide awake afterwards. The color is nice and it's more moist than thick and spreads well. An easy recipe if you want a spread that will keep a bit longer than a ripe plum.
Tuesday, September 18, 2012
Cococotini Recipe - Lulu B. Chocolate Martini
Remember I mentioned that the Lulu B. Chocolate Martini was fabulous plain? Cause it is. But I thought it might be even more amazing if I mixed it into some drinks. Especially a drink with coffee. :)
The very first thing that crossed my mind was coconut because it goes great with chocolate. Then I needed something to thicken it hence the heavy cream, an added chocolate boost and some coffee to round it out. I ended up with a yummy balanced chocolate, coconut, coffee martini. With a little shredded coconut on top.
Cococotini Recipe
1 ounce Lulu B. Chocolate Martini
1/2 ounce heavy cream
1/2 ounce cream of coconut
1/2 ounce fresh brewed coffee
1-2 teaspoons chocolate syrup
5-6 ice cubes
Combine all in cocktail shaker. Shake, strain and serve. Easy peasy!
Susie Savors: The cococotini is rich with three of my favorites: chocolate, coconut and coffee. A trifecta that mixes into a mouthful of cream and sweet. The cream of coconut adds sweetness while the coffee cuts down on the sweet just enough. The cream adds thickness to the mix. The chocolate sings out the mellow tang. A perfect mix for fall.
*This is a sponsored post. I was sent this product for review. All opinions are my own.*
Wednesday, September 12, 2012
Wholesome Wednesday: Coconut Pound Cake Recipe
I've always loved pound cake. Growing up, we frequently had Sara Lee frozen pound cake. Actually we always had a lot of Sara Lee things because both my parents grew up in Chicago and were used to having it. Typically we had it with strawberries and Cool Whip both of which were also frozen. So it was a dessert that you could always have on hand.
I also love all things coconut. I actually wish that Baker's Coconut would make bigger bags. :( I go through them pretty quickly. Coconut is good for you too. Although I'm not sure its as good for you when you have it in oatmeal with caramel and chocolate. But it tastes soo good and you're eating oatmeal! LOL
Anyway, why not combine the two in a super yummy pound cake? That's exactly what this recipe has done. A cobbled together pound cake recipe with some added coconut. A major yum! I also see having grilled slices topped with fruit and whipped cream. Below, you'll see it paired with diced fresh peaches and peach whipped cream. YUM!
Coconut Pound Cake
1 stick unsalted butter, room temperature
1 cup granulated sugar
2 eggs
1 teaspoon vanilla extract
1 cup milk
2 cups flour
3 teaspoons baking powder
1/2 cup shredded coconut
Cream butter and sugar, until light and fluffy. Add eggs, one at a time mixing till incorporated. Add vanilla, mix. Mix flour and baking powder in separate bowl. Alternate adding flour and milk, starting and ending with flour. Mix well. Add coconut, mix.
Bake in a greased 9 x 5 inch loaf pan at 350 degrees for 30 minutes, then reduce heat to 325 degrees and bake 20-25 minutes more. Cool in pan on wire rack for 10 minutes. Then remove from pan and cool completely before serving. (I used a 8 x 4 inch glass baking pan, because none of my other pans are exactly 9 x 5 inches.)
*Edit* Even seasoned bakers sometimes have flubs. My pound cake looked gorgeous out of the oven, but after cooling it would not come out of the pan. :( So it ended up like this.
It looks awful, but tastes amazing. :)
Susie Savors: This pound cake is a slight remix on the traditional recipe. The minor changes meant that it is still rich and thick, yet there is a freshness added with the added coconut. The new flavor adds a twist that is not too strong of a change an old favorite. Besides, as I've mentioned before coconut is a great addition to any meal. The nutritional benefits stand even in a dessert; there's a reason a third of the world relies upon this wonder nut. It may just make you feel better inside and out!
Monday, September 10, 2012
Braided Spaghetti Bread Recipe
Let me start off by saying that I'm just as addicted to pinterest as everyone else seems to be. But I tend to mostly look at food while on there. I look at a lot of recipes but rarely write anything down, as I've found a lot of them use prepackaged ingredients or have too much fat in them.
Recently I came across this recipe on the Rhodes Bread blog which used Rhodes frozen bread dough. I'm not a big fan of Rhodes bread dough because it always comes out soft and mushy when you bake it. I decided to make my own bread dough, because everything is easy with the bread machine. I also increased the spaghetti sauce, added 1/2 lb ground beef, used different cheese, an entire egg and garlic powder. Phew! That's a lot more changes than I thought I'd made. Adding the garlic powder to the outside made it taste like the spaghetti was encased in garlic bread fresh from the oven. :) It turned out really well, everyone liked it. Mine did expand a lot in the oven though.
Braided Spaghetti Bread
1 loaf bread dough (I can add recipe if anyone wants it)
6 ounces spaghetti, cooked
2 cups spaghetti sauce
1/2 lb ground beef or Italian sausage
1 clove garlic, minced
8 ounces shredded touch of Philly mozzarella
1 egg, beaten
grated Parmesan
garlic powder
Roll risen bread dough on parchment paper to 12-16 inches. Cover with plastic wrap and let rest 10-15 minutes.
Cook pasta and drain. Meanwhile, brown ground beef in saucepan. When browned, drain and add minced garlic, stirring till fragrant, about 30 seconds. Add 2 cups spaghetti sauce, allow to come to a boil. Remove from heat. Stir in spaghetti, then place mix lengthwise down the dough from top to bottom in a 4 inch wide strip. Cover with shredded cheese.
Make cuts 1 1/2 inches apart on sides of dough with in 1/2 inch of the filling.
Begin braid by folding up top and bottom strips towards filling. Then braid left over right, right over left. Finish by pulling last strip over and tucking under.
Place on baking sheet. Brush with egg wash and sprinkle with Parmesan and garlic powder. Bake at 350 degrees for 25 minutes. Slice and serve.
Susie Savors: You can't go wrong with a one dish meal. This is spaghetti and garlic bread all in one bite. The bread to spaghetti ratio is just right, not too dry and not too juicy. The outside is crusty especially with an extra layer of cheese while the inside is gooey. Easy to make and this giant hot pocket will deliver the goods. Overall, a new family favorite because food tastes better inside a fresh loaf of bread!
Friday, September 7, 2012
Honey Mint Fruit Salad Recipe
Y'all know by now how I love to share recipes that I've found, tried and love. :) This is another of those. I recently came across Savory Sweet Life. Yet another cookbook. You'd seriously be shocked at how many I peruse for inspiration.
Remember the gorgeous fruit salad I posted photos of from my Sears Photography Class? Well this is the recipe I used. It's incredibly easy to throw together and tastes yummy! Even if you go a little overboard on the mint like I did. It was a lot of fruit, the entire fruit salad was gone the very next day!! A definite recipe endorsement!!
Honey Mint Fruit Salad
juice of 1 lime
3 tablespoons honey
3 tablespoons finely chopped mint
6-8 cups freshly chopped fruit
In a large bowl, whisk lime juice, honey and mint until well combined. Add fresh fruit and toss.
I refrigerated mine for a couple of hours before serving as I wanted to make sure the flavors had a chance to meld.
Wednesday, September 5, 2012
Wholesome Wednesday: Coconut Oatmeal Cookie Recipe
We love cookies at my house. But we love them more when they're unusual. I can easily see these becoming a favorite. Not that they beat whole wheat peanut butter oatmeal chocolate chip, but they're just such a different taste. They're kinda like a macaroon without the chocolate on the bottom.
They're crisp, golden brown and still chewy. I'm pretty sure that's all the coconut making them moist. If you really need a chocolate fix, you could add half a cup of chocolate chips. While working on these, I almost threw in some chopped up caramels. However, I thought they'd end up too sweet. I love the oatmeal in them too. Let's face it I love just about everything with oatmeal in it. :)
Coconut Oatmeal Cookies
1 cup flour
1/2 teaspoon baking powder
1/2 teaspoon salt
1/2 teaspoon baking soda
1/3 cup butter or shortening
1/2 cup granulated sugar
1/2 cup brown sugar, packed
1 egg
1 teaspoon vanilla
1/2 cup oats
1 cup sweetened shredded coconut
Mix flour, baking powder, salt and baking soda in a medium bowl and set aside. Cream butter/shortening with sugars until light and fluffy. Add egg and vanilla and beat well. Add flour, oats, coconut and mix thoroughly. Scoop with a tablespoon sized cookie scoop onto ungreased cookie sheets. Bake at 375 degrees for 10-12 minutes.
This recipe makes about 30 cookies if you use tablespoon sized cookie scoop.
Susie Savors: Crisp and tangy these are a great treat. They're healthy as far as regular cookies go, they do have oats with fiber and they help to control blood sugar. With the added benefits from coconut, these are a guilt free pick me up. The sweet is paired with the nutty coconut and complemented by the texture of the oats. A mouthful of intrigue that will keep you sneaking just one more. You won't be the only one.
Tuesday, September 4, 2012
Jucy Lucy Burger Recipe
Months ago we saw America's Test Kitchen do a segment on these burgers which had lots of gooey cheese inside them. :) I did make them for one of my meals in the SoFabU Sears Grilling Photography class.
For the class, we weren't posting recipes. I think my brain would have imploded if I'd had to worry about recipes along with all the meals I was planning and photographing at the time. I'm very glad I took the class because my photos have majorly improved but it was a lot of work.
The Jucy Lucy burgers were really good. I haven't made them since the class, but we'll definitely keep them in rotation. The trick is making sure the cheese is entirely encased and sealed in the ground beef. I had a couple of burgers which I thought were sealed, but leaked a bit.
Biting into one and getting that gooey cheese is truly amazing. So much better than a cheeseburger. The meat also stayed moist and tender even after handling it so much. If you're looking for a stand-out burger, this is it!!
Jucy Lucy Burgers from Cook's Country 9/07
2 slices hearty white sandwich bread, torn into rough pieces
1/4 cup milk
1 teaspoon garlic powder
3/4 teaspoon salt
1/2 teaspoon pepper
1 1/2 pounds 85% lean ground beef
1 slice deli American Cheese (1/2 inch thick), cut into quarters
Using a potato masher, mash bread, milk, garlic powder, salt and pepper in a large bowl until smooth. Add beef and gently knead to combine.
Divide meat evenly into 4 equal portions. Using half of each portion, encase cheese to form a mini burger patty. Mold remaining half portion of meat around patty to seal edges and form a ball. Flatten ball to form a 3/4-inch thick patty. Transfer to plate and refrigerate 30 minutes-24 hours.
Grill over medium heat till well browned and cooked through, 6-8 minutes per side. Transfer to plate and tent with foil, let rest 5 minutes.
This last photo is a cooled Jucy Lucy burger. But it definitely shows how much cheese is actually in these burgers!! Just imagine fresh from the grill...definitely juicy!!
Subscribe to:
Posts (Atom)